Laptop Linux: A (perhaps too deep) Dive into a Kernel Oddity
This blogpost is a synopsis of my personal journey chasing apparent oddities in the way my laptop’s brightness is set.
a new laptop
A few months ago my (not so) old thinkpad was falling apart. The delete key was missing (which, does not lead to less mistakes, as I have learned), and the screen was affixed to the laptop lid by painters tape.
I am reluctant to switch laptops, as the setup and personalization cost is super high. It takes me probably around 5-6 hours to setup a new laptop and iron out all the bugs. From installing Gentoo, to provisioning new ssh keys, to dwm, and doing configs for all my favorite apps.
A few years ago, I would’ve enjoyed this process, but now since I am employed, I really can’t afford the down time.
However this all came to a head when I was demoing something important for someone and I pulled out my laptop. They kind of gave me an odd look as I revealed the grimy thing. And this is when I figured it was time for a new one.
So I began the arduous process of setting up a new laptop.
copped another one today gotta install gentoo on it. pic.twitter.com/tWqqNVHX86
— rohan (@rohanganapa) July 21, 2025
setting my laptops brightness
Whenever I get a new laptop I modify this bash script to work with my laptops backlight so I can set the brightness. I’ve used the script it for many years and it has served me well. Though, I am sure there is a GUI or something that does this better.
#!/bin/bash

brightness_level=$1

if [[ -z $brightness_level ]]; then
  echo "Please provide the brightness level as an argument."
  exit 1
fi

doas sh -c "echo $brightness_level > /sys/class/backlight/amdgpu_bl0/brightness" >/dev/null
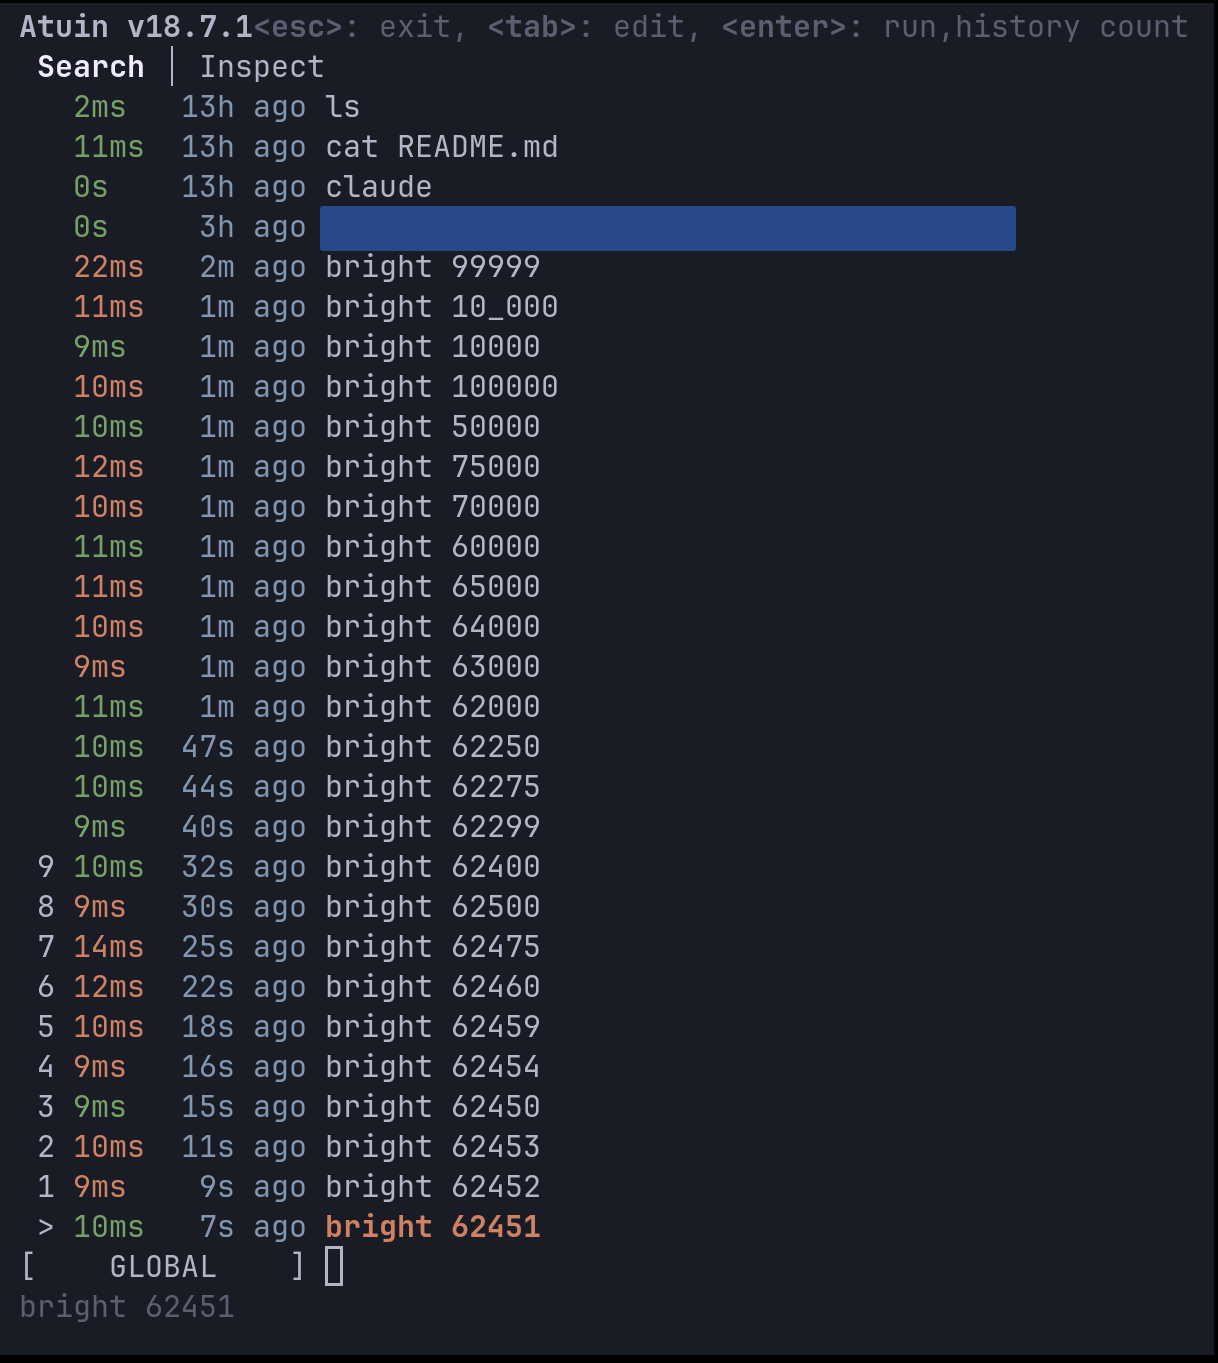
Then I set the brightness from the command line. Generally, I go through an extremely inefficient process of discovering the max and min brightness by sampling different levels across the range. I start by doubling values until I hit the maximum, then try the midpoint between the last value that worked and the first that didn’t—essentially a binary search between the bounds. This gives me a feel for how the backlight behaves at different levels. (Yes, I’m aware the min/max values can be easily read directly.)
This is where the oddities began.
weird behavior
Generally in my experience the max brightness is 65535, a well known number to anybody who has been into computers for a while, the 16 bit integer limit.
However, in this case, the max brightness is 62451. A seemingly randomly chosen number, and tantalizingly close the 16 bit integer limit which I expected. I immediately searched this number up, perhaps there was some obvious meaning behind it, but I found nothing.
The next oddity came when I was trying to dim my screen. I figured out setting the brightness to 512 was actually dimmer than setting my brightness to 0. And that setting 0-235 (another seemingly random number) was all the same brightness, and all those brightness level’s were dimmer than 235! 0-235 seemed equivalent to some brightness level between 2000 and 4000. (all of this found out through the same inefficient binary search-type process!)
At this point I had spent upwards of ten minutes furiously typing random numbers into my terminal and staring very closely to my screen trying to discern the most minute changes in brightness. On top of this, my curiosity as to how these numbers were “chosen” and the reason for this unexpected behavior was sufficiently piqued.
So I started debugging and reading the code for the display drivers.
down the rabbit hole
My first instinct was to systematically map out this weirdness. I wrote a quick loop to scan through brightness values and record what the system actually reported back:
for v in $(seq 0 260); do
  printf "%s" "$v" | sudo tee /sys/class/backlight/amdgpu_bl0/brightness >/dev/null
  sleep 0.05
  echo "$v,$(cat /sys/class/backlight/amdgpu_bl0/actual_brightness)"
done
(see, I do know how to do things the right way)
The results confirmed my suspicions. Values 0 through 235 all reported actual brightness around 3084-3313, barely budging. Then at 236, boom—actual brightness suddenly equaled the set value. It was like hitting a cliff edge.
Next, I discovered that the AMDGPU driver exposes the raw PWM values through debugfs. This was gold—I could see exactly what the hardware was being told:
printf "%s" 235 | sudo tee /sys/class/backlight/amdgpu_bl0/brightness >/dev/null
sudo cat /sys/kernel/debug/dri/0/eDP-1/amdgpu_current_backlight_pwm  # -> 0x1861

printf "%s" 236 | sudo tee /sys/class/backlight/amdgpu_bl0/brightness >/dev/null
sudo cat /sys/kernel/debug/dri/0/eDP-1/amdgpu_current_backlight_pwm  # -> 0x0CED
At 235, the PWM was 0x1861 (6241 decimal). At 236, it dropped to 0x0CED (3309). The hardware itself was getting wildly different values right at that threshold. Something fundamental was happening at this boundary.
the first clue: that number isn’t random
Remember that weird max brightness of 62451? It was bugging me. In my experience, computers don’t pick arbitrary numbers—there’s always some logic, even if it’s twisted.
So I did what any reasonable person would do: started doing arithmetic with it.
65535 - 62451 = 3084
Interesting. The difference between the expected max (65535) and my actual max was exactly 3084. That meant my brightness range wasn’t 0 to 62451, but more like 3084 to 65535, with the bottom 3084 values… missing? Reserved?
I converted 3084 to hex: 0x0C0C. Now that was a pattern. It’s the same byte (0x0C, which is 12 in decimal) repeated twice. In driver land, when you see a byte value duplicated like this, it often means someone scaled an 8-bit value to 16-bit.
See, when you want to scale a value from 0-255 (8-bit) to 0-65535 (16-bit) proportionally, you multiply by 257 (0x101). It’s a neat trick: 0 stays 0, 255 becomes 65535, and everything in between scales linearly. And if you had a minimum brightness of 12 in the 8-bit world, scaling it up would give you… 12 × 257 = 3084.
So my hypothesis: somewhere, something was declaring a minimum brightness of 12 out of 255, the driver was scaling that to 16-bit space, and then exposing only the range above that minimum to userspace. That would perfectly explain the 62451 maximum.
But why would there be a minimum brightness in the first place? Time to dig deeper into the driver code.
into the kernel source
Time to dig into the AMDGPU driver code. After some quality time with grep and find, I found the smoking gun in drivers/gpu/drm/amd/display/amdgpu_dm/amdgpu_dm.c:
*max = 0x101 * caps->max_input_signal;
*min = 0x101 * caps->min_input_signal;
The driver was taking 8-bit min/max values from somewhere and scaling them up to 16-bit. If min_input_signal was 12, that would give us our 3084 floor. But where were these “caps” coming from?
Further down, I found something even more interesting—the driver was applying a “custom luminance curve”:
static void convert_custom_brightness(...) {
  u32 b = scale_input_to_fw(min, max, *user_brightness);
  // Walk caps->luminance_data[], interpolate if between points
  // Then val = round(luminance_percent * b / 101)
  // Finally map back to [min..max]
}
A curve? This was getting interesting. The driver was taking my brightness value, running it through some kind of translation table, and then sending it to the hardware. This does make sense, human hearing is notoriously logarithmic because of the inverse square law and we measure volume in dB. Light and vision, I assume, is the same way. iTunes has log-volume, which is how I know this. Another example, pulseaudio, uses cubic volume.[0]
the firmware tells all
The caps and luminance curve were coming from ACPI—specifically, something called ATIF (a legacy name from the ATI days). I needed to see what my laptop’s firmware was actually telling the driver.
Using ACPICA tools, I could directly query the ACPI method:
acpiexec -b "evaluate \\_SB.PCI0.BUSA.GFX0.ATIF 0x10 0; quit" dsdt.dat ssdt*.dat
The response was a buffer of hex data. After decoding it (with help from the ATIF spec), I found:
- Min input signal (MIIS): 12
- Max input signal (MAIS): 255
- 49 pairs of (luminance%, input_signal) values defining the curve
The curve started at (2%, signal 14) and ended at (98%, signal 247). Here’s the kicker: these signal values were 8-bit (0-255), but the driver was comparing them against 16-bit scaled values.
the math behind the madness
Here’s what was actually happening:
- The firmware says “minimum brightness is 12/255, and here’s a curve for how brightness should map to luminance”
- The driver scales the min/max to 16-bit: min=3084, max=65535
- When you set brightness to 0-235, the driver:
- Scales your value to “firmware space” (0-65535)
- Walks through the 8-bit curve points
- Since the scaled value is still ≤247 (the last curve point), it applies the curve
- The curve keeps the PWM values clustered near the minimum (that’s why everything looks the same)
- At brightness 236:
- The scaled value exceeds 247
- The curve is no longer applied
- The driver switches to linear mapping
- Suddenly your brightness value maps directly to PWM
The “cliff” at 236 is exactly where the math says it should be: 247 × 62451 / 65535 ≈ 235.5. **The curve is made for the 8-bit values/range, but is being applied to the 16-bit firmware values. **
I am not exactly convinced this is a kernel bug, perhaps the vendors in their firmware should be providing the map in the 16-bit space. But also from the vendors perspective, both the maps and the min and max values are in 8-bit, and if the kernel converts the 8-bit min/max, it should also know to convert the luminance map as well. I’m not well versed enough in the kernel’s development process or otherwise to know for sure.
Of course, in the end, I am still using my old brightness script, and just set 236 when i want the minimum brightness. But at least now I know why!
epilogue
I am afraid to count how many hours of work this blog took away from work, but I think I was due for a break anyways. I think it’s generally a worthwhile endeavor to pursue things that fulfill curiosity. That’s pretty much how I learned everything I know today anyways. Perhaps this was the real hidden cost of switching my laptop.
[0] I won’t bore the reader with a longer digression inline, so I made this footnote. This sort of log/cubic scaling is actually really important/common in terms of UX. It shows foremost in brightness and loudness, but also other, less typical places.
When designing robots, or rather the UX/instrumentation that goes into controlling robots, I often use cubic scaling on the control inputs. This is because the operator usually needs more fine control and fidelity in low speeds and less in higher ones. One might imagine two modes of control: carefully positioning the robot into or out of a precarious position and traveling at high speeds. Generally if you are just traveling between spots you are going to be going as fast as possible anyways and bang the controller to the max, you generally don’t need to make distinctions between 90% power and 100% power.
Another place this comes up is in FPS games. There is a program called rawaccel which does highly customizable kernel level mouse acceleration. This is useful in games with a similar bimodal control region to the robotics example. In FPS games such as Valorant, you generally are doing small micro movements to lock onto the opponents head, or big flicks. Low sensitivity allows for noise/errors in your control input to be minimized, but high mouse sensitivity allows for faster flicks. With rawaccell you theoretically get the best of both worlds.
Though another school of thought is that learning non-linear mouse schemes is harder for you brain, and requires controlling the actual position of the crosshair through another free variable which is acceleration. This tradeoff of course leads to different curves like a piece-wise curve, so you explicitly only have to learn two separate linear regimes.
In some cases these schemes which map user input non-linearly decreases cognitive load (volume, light) and in some cases increases fidelity but with a drawback of a higher learning curve (robotics, FPS games). Actually, in the robotics case, it could decrease or have the same cognitive load because what the control input maps to is usually torque/force and the control law you learn is effectively non-linear as torque non-linearly correlates to position.